HelpWriting and sending
Writing an issue
The editor, the author, pictures, buttons, HTML blocks, moving and deleting blocks, names and fields, sections for some readers, the footer, the preview and test emails.
Write, review, send
Start a draft with New, on the Campaigns page. A campaign goes through three steps, shown at the top: Write, where you type the subject, the preview text and the issue, and pick its author; Review, its author and a checklist of what to fix before it can go out and of what may look broken; and Send, where you pick who gets it and when. Everything saves as you type, and a check shows each time it's saved. While you edit, the sidebar folds down to its icons to leave the issue more room.
New asks what to start: an Email, your own HTML sent as it is by email, or a Post written in this editor. In an Email, paste the code or upload an .html file: its title becomes the subject and its preheader the preview text, and you can change both. Put {{unsubscribe_url}} in its unsubscribe link. To start from a campaign you have, use Duplicate in its menu: the copy opens as a new draft with its subject, followed by (copy), and the campaign you copied stays as it is.
The preview text is what inboxes show after the subject. Without one, they show your issue's first words.
The author
Author, under the preview text, says who wrote the issue: their name, their email and, if you like, their picture. Readers see “By” and their name, after their picture when they have one, at the top of the email and under the title of the issue's page on your website. Replies to the issue go to their email, which never shows on the issue or its page.
An issue needs an author before it goes out: the review step's checklist asks for one when it has none. On your newsletter's first issue, Add an author starts with your name and email, or the reply-to address you had set, which you can change. Your first author is your newsletter's default author: each new issue starts with them, and replies to your welcome, confirmation and last-chance emails go to them. Pick another default under Author on the Sender page. Click an issue's author to pick another for that issue, add one, up to 20 for each newsletter, or edit the one you picked. A picture that isn't square opens in a crop: drag it into place and zoom until it fits. For each author, choose where they show:
- Show on the web: their name under the title of their issues' pages. Off, the page shows your newsletter's name, as for issues without an author.
- Show in emails: their name at the top of their issues' emails, next to Read online.
With both off, readers don't see who wrote it, and replies still go to the author. A change to an author shows at once on their issues' pages and in the issues you haven't sent: emails already on their way keep the author they went out with. Everyone on your team can add an author and pick one; your newsletter's admins also edit and remove them, and pick the default one. Removing an author takes their name off their issues' pages, and removing the default one makes the first of the others the default. Issues you sent or scheduled before authors stay as they are: they go out with no name, and their replies go to your default author.
The editor
- Formatting: select text to get bold, italic, strikethrough, a link, two heading sizes and a quote.
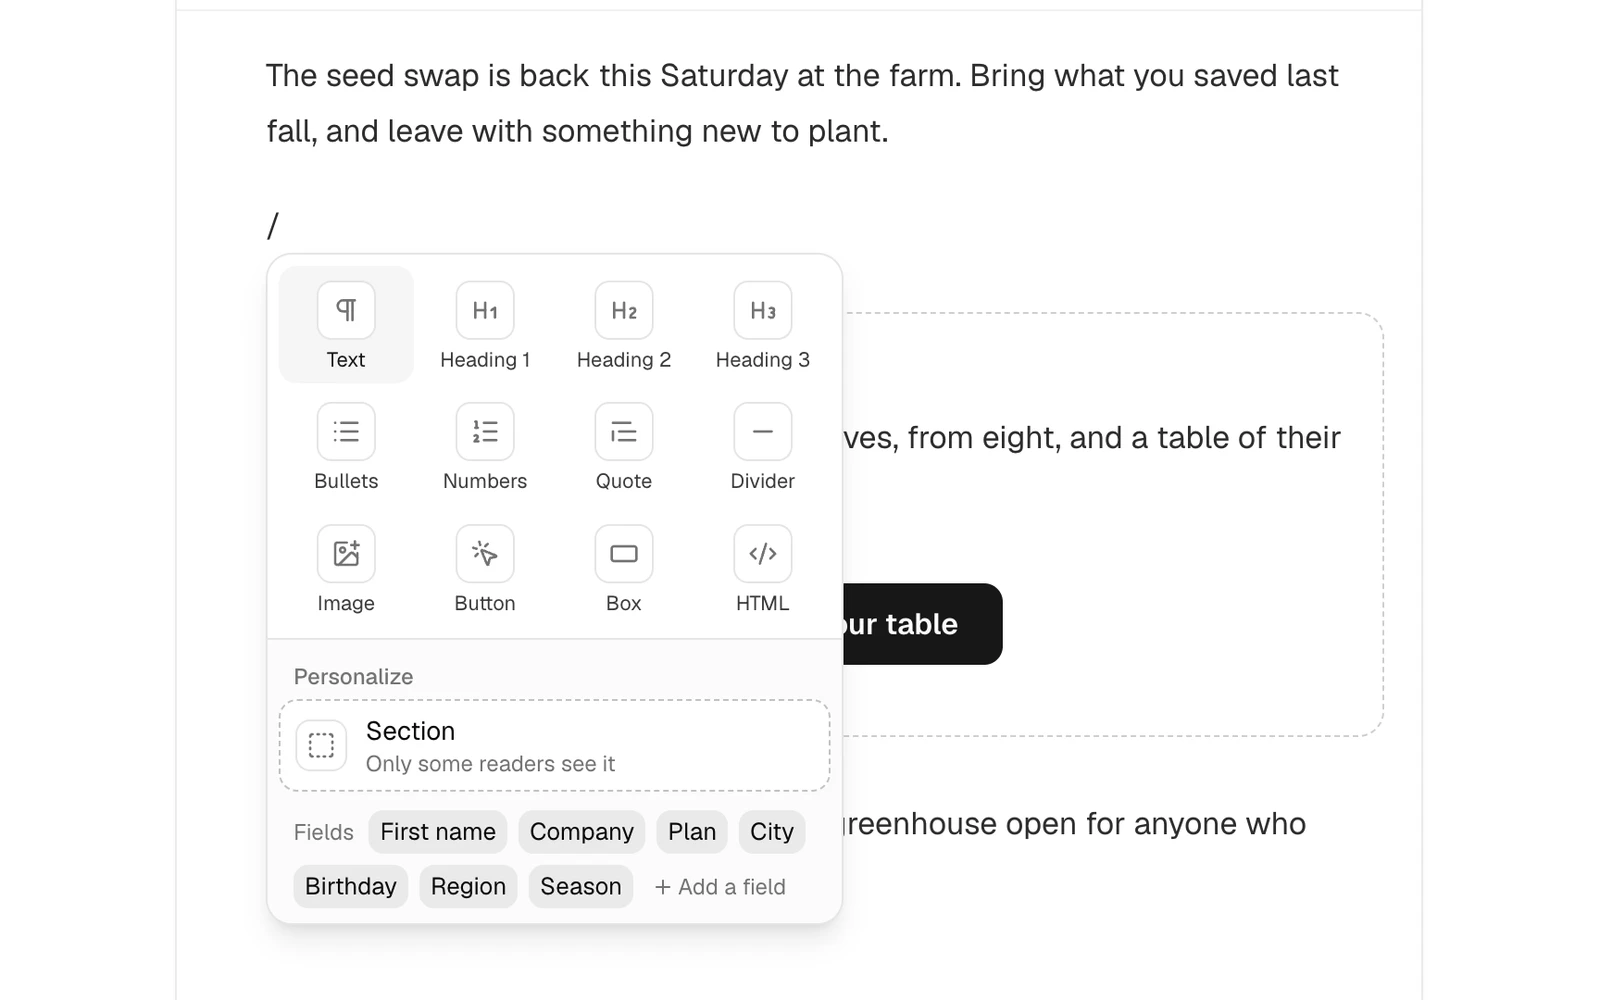
- Slash commands: type / on an empty line for text, three heading sizes, bulleted and numbered lists, a quote, a divider, a picture, a button, a box, which sets a block apart on a gray background, or your own HTML. Under them, Personalize has a section for some readers, then the first name and your own fields, and Add a field to make a new one without leaving the issue. The arrow keys move through the menu. Keep typing after the slash to find any of them, like /quote or a field's name.
- Links: select text, press ⌘ K (Ctrl K on Windows) and paste the address. An email address becomes a link that opens an email to it.
- Markdown: shortcuts work as you type, like
#and a space for a heading,-for a list or>for a quote.
Pictures
Paste a picture, drop it in the editor, or type / and pick Image to upload one or use one you uploaded before. PNG, JPEG, GIF and WebP work, under 4 MB. Wider pictures are resized to 1,200 pixels. A picture shows at once and uploads in the background, and its address never changes, so sent emails keep showing it.
Drag the handles on a picture's sides to resize it. Point at it to show its toolbar, inside its top edge (on a touch screen, tap the picture): place it on the left, in the center or on the right, add its alt text, or delete it. Emails and your website keep it where you put it.
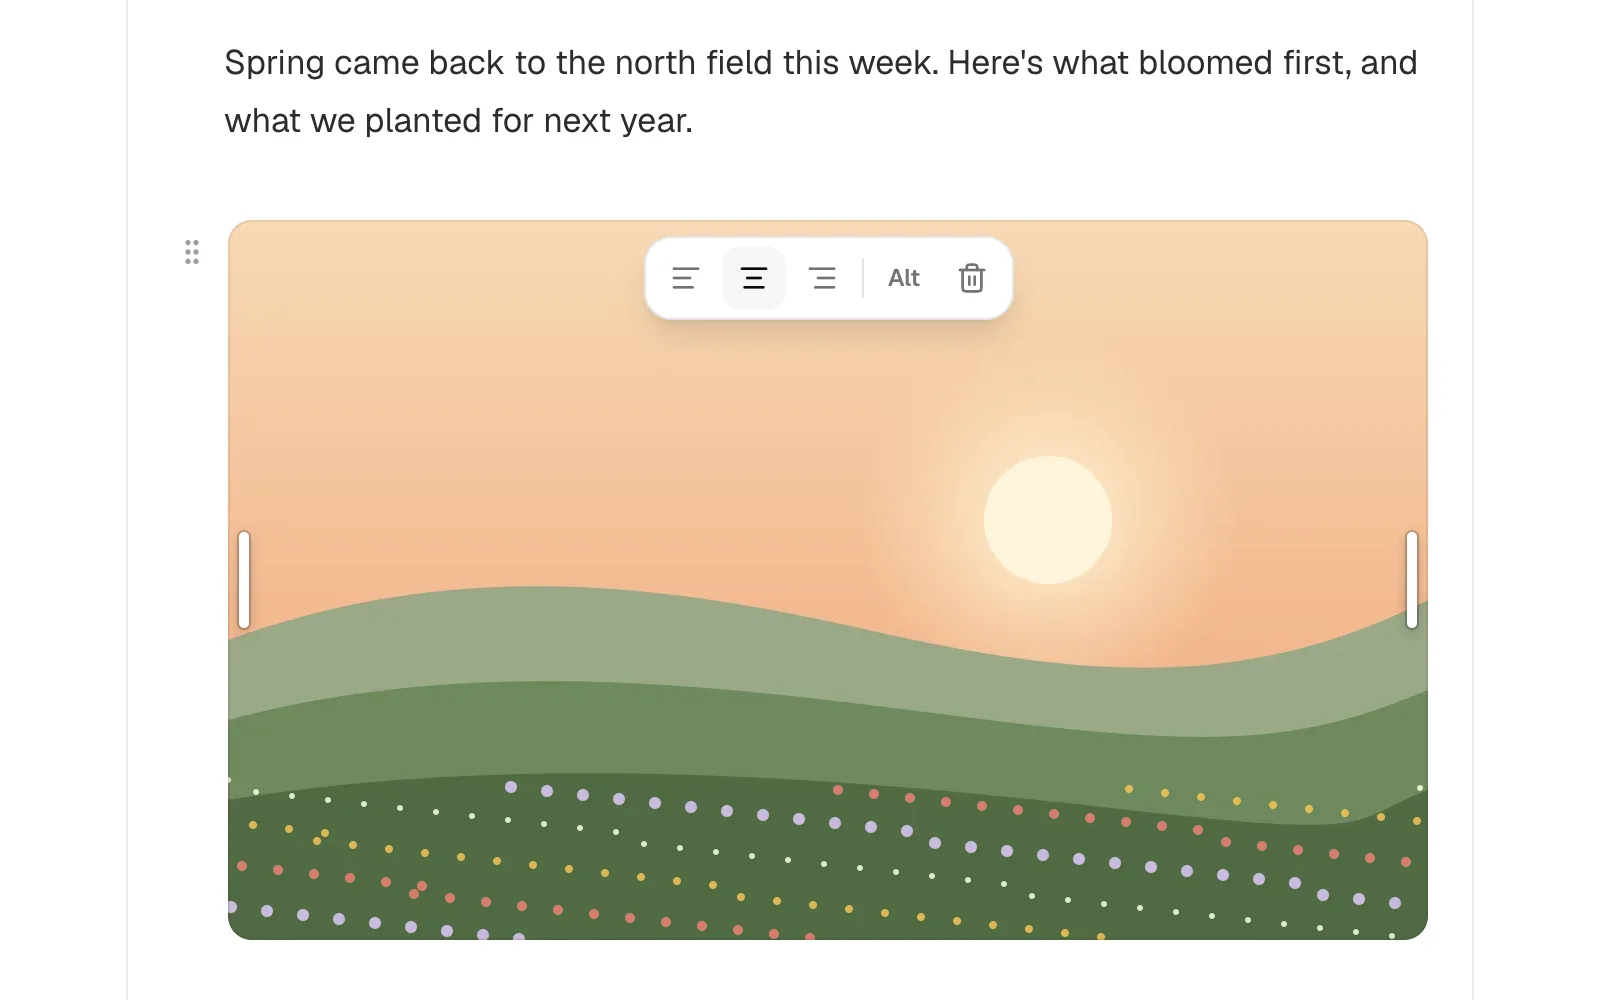
Alt text describes the picture in a few words, for readers who can't see it, inboxes that block images and search engines reading your website. Click Alt and type it: it saves as you type, and Enter closes it. The Alt button stays highlighted once a picture has one.
Buttons
Type / and pick Button to add a link readers can't miss, like Read the full story or Join the waitlist. Type its text right on the button, press Enter and paste the link it opens: a web address, or an email address, which opens an email to it. Enter again goes on below it. While you write on a button, a bar above it shows where it goes, places it on the left, in the center or on the right, and deletes it, which you can undo. Click its link, or press ⌘ K, to change it. Names and fields work in its text and its link.
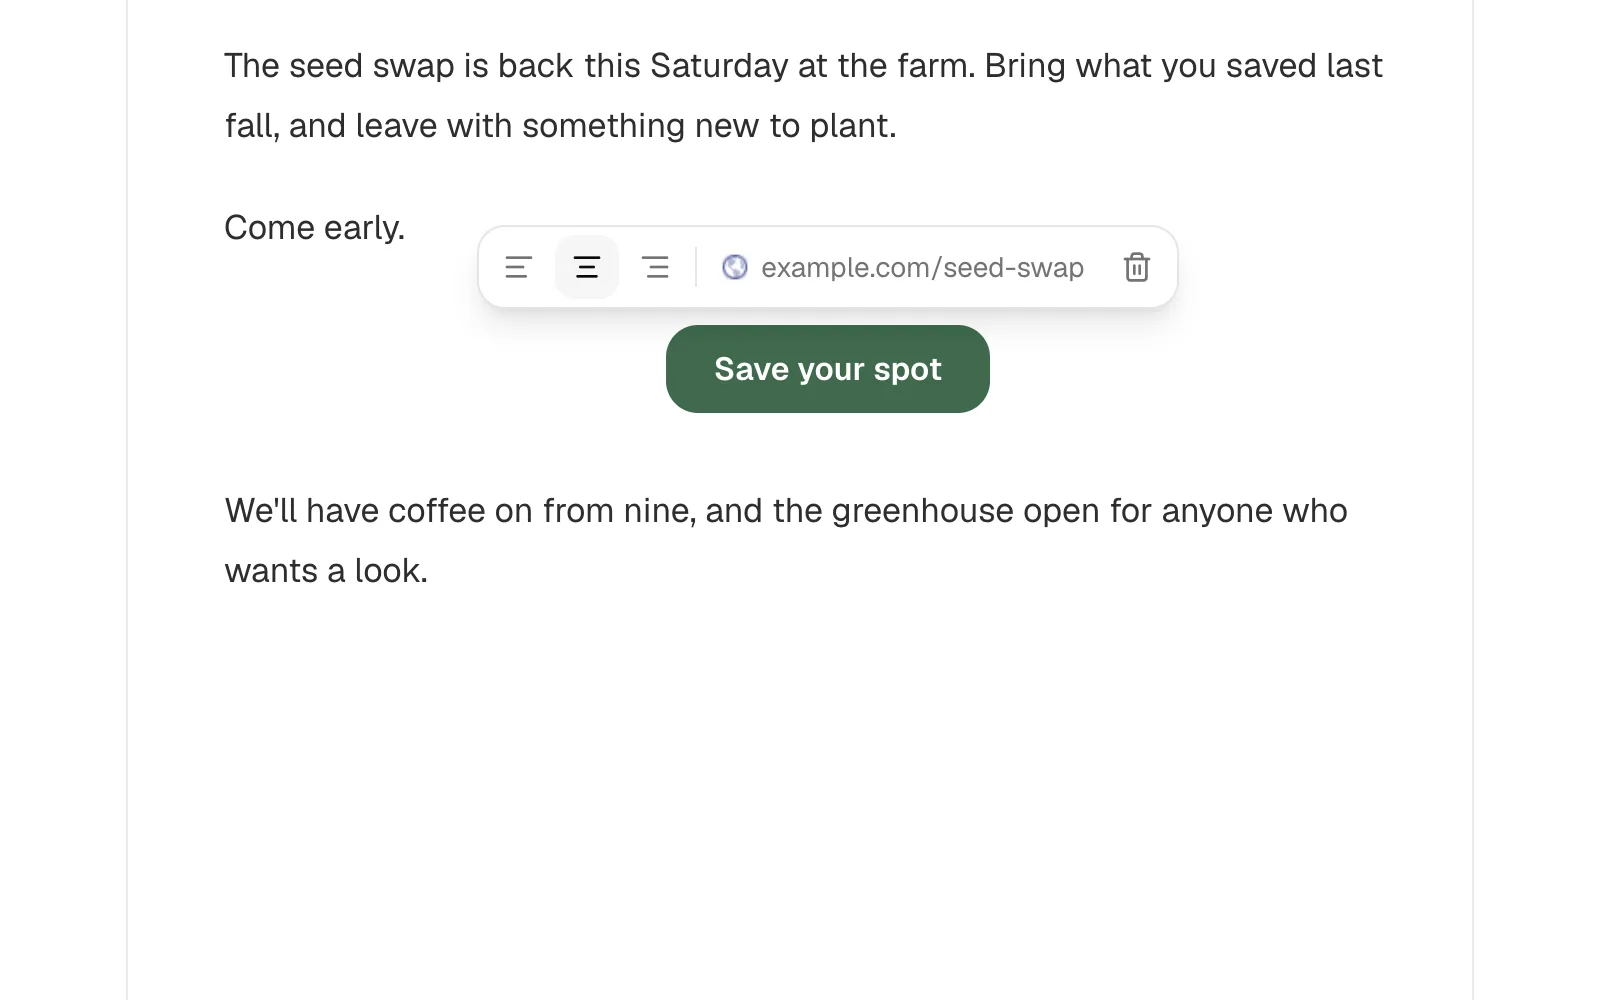
Buttons take your newsletter's theme: its accent color, with text that reads on it, and its corners, in your emails and on your website. Change them in Design, and every button follows. A button needs its text and its link before the issue can go out: a red dot beside it says which is missing once you move on, and so does the review step.
HTML blocks
Type / and pick HTML to add your own HTML to an issue, like a table, a sponsor's banner or a signature. Paste or type it, and its tags, attributes and styles show in color. Click Done or press Esc when you're finished: the block then shows what readers get, in your newsletter's email design. Click it to change it again, and Preview shows it in the whole email.
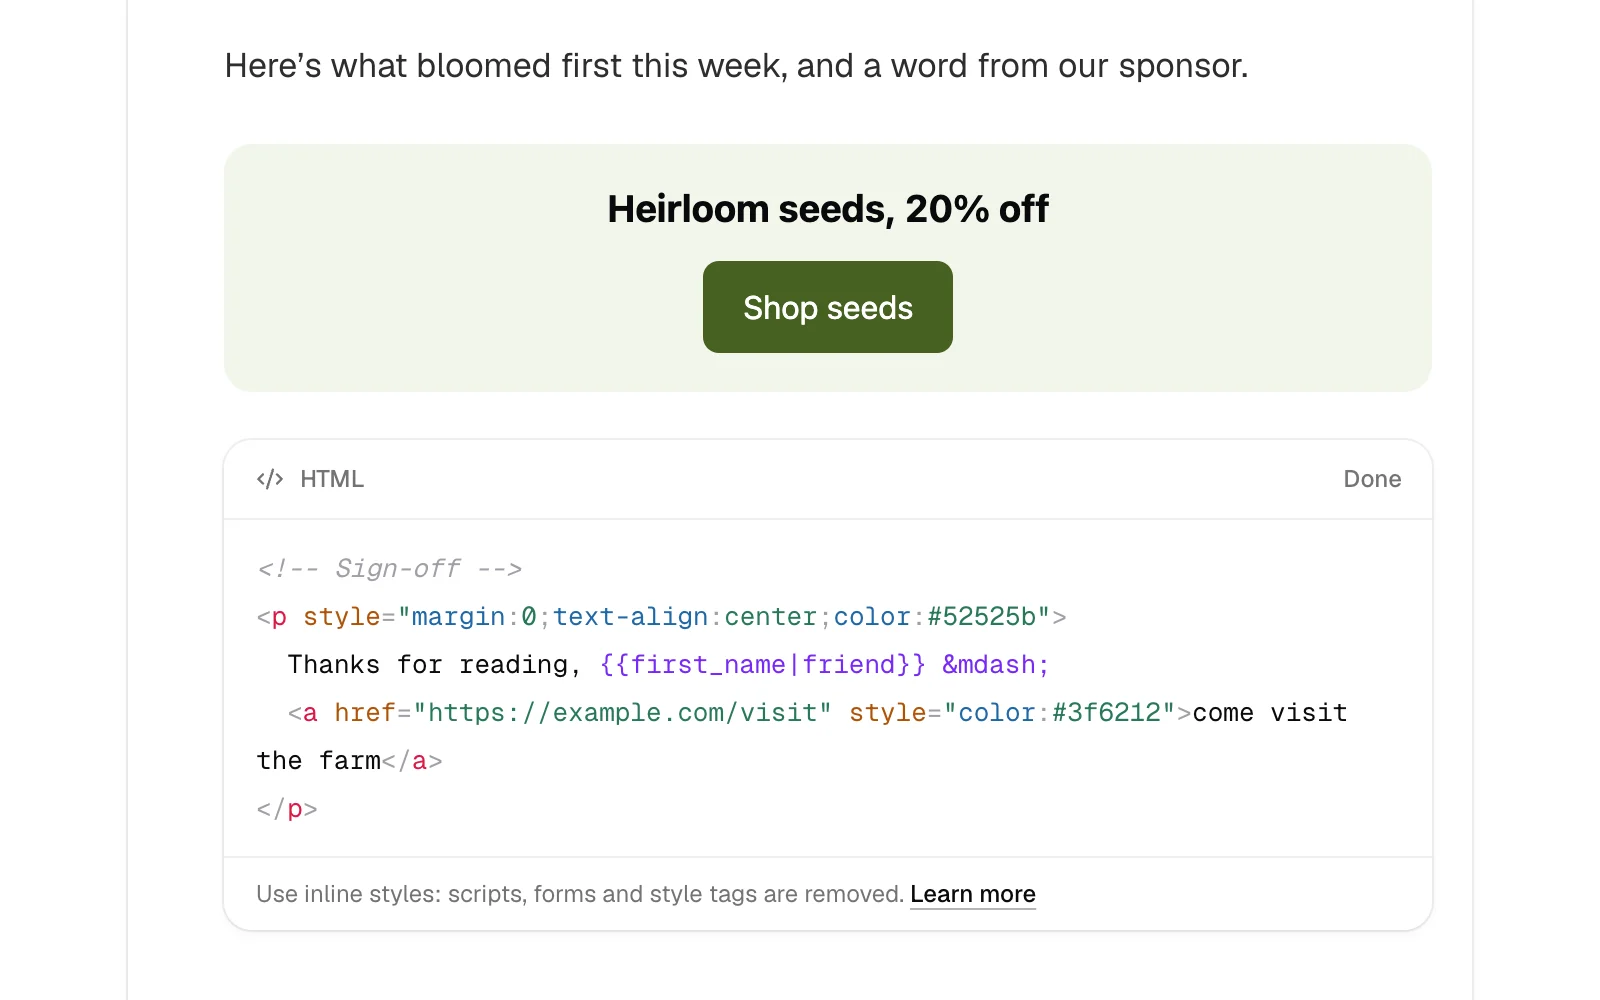
To delete a block, click it, then the bin next to Done. It goes at once, and Undo brings it back.
Your emails and your website get the same block, cleaned first. Scripts, forms, frames, <style> tags, classes and ids are removed, and so are styles that could move the block over the rest of the issue, like position or a negative margin. Style each element inline instead, with style="…". Tables, colors, fonts, borders, spacing and sizes stay, and so does object-fit: a picture with object-fit: cover fills the size you give it, cropped to fit rather than stretched. Links and pictures need their full address, starting with https://. Names and fields work in its text and its links.
While you edit a block, the line under its HTML points out tags that don't match up, like a <table> never closed, which can take in everything after it, and what the cleaning removes. Once you click Done, an amber dot beside the block does, and so does the review step.
Embeds that need a script, like a video player or a signup form from another site, can't work in an email: link to them instead. Where the HTML sets no font or color, your website shows the block in its own.
Moving blocks
With a mouse, a grip appears to the left of the paragraph, heading, list, picture, box, button, HTML block or section under the pointer. Drag it to move the block: it lifts from its place, and a box its size shows where it lands, the blocks around gliding aside to make room. Near the top or the bottom of the screen the page scrolls, and so does your trackpad or mouse wheel, so a block can go anywhere in the issue. It lands between blocks, never inside a section, which moves as one block. Escape puts it back. Click the grip to select the block. From the keyboard, ⌘ Shift ↑ and ⌘ Shift ↓ (Ctrl instead of ⌘ on Windows) move the block the cursor is in. Moves undo like any other change.
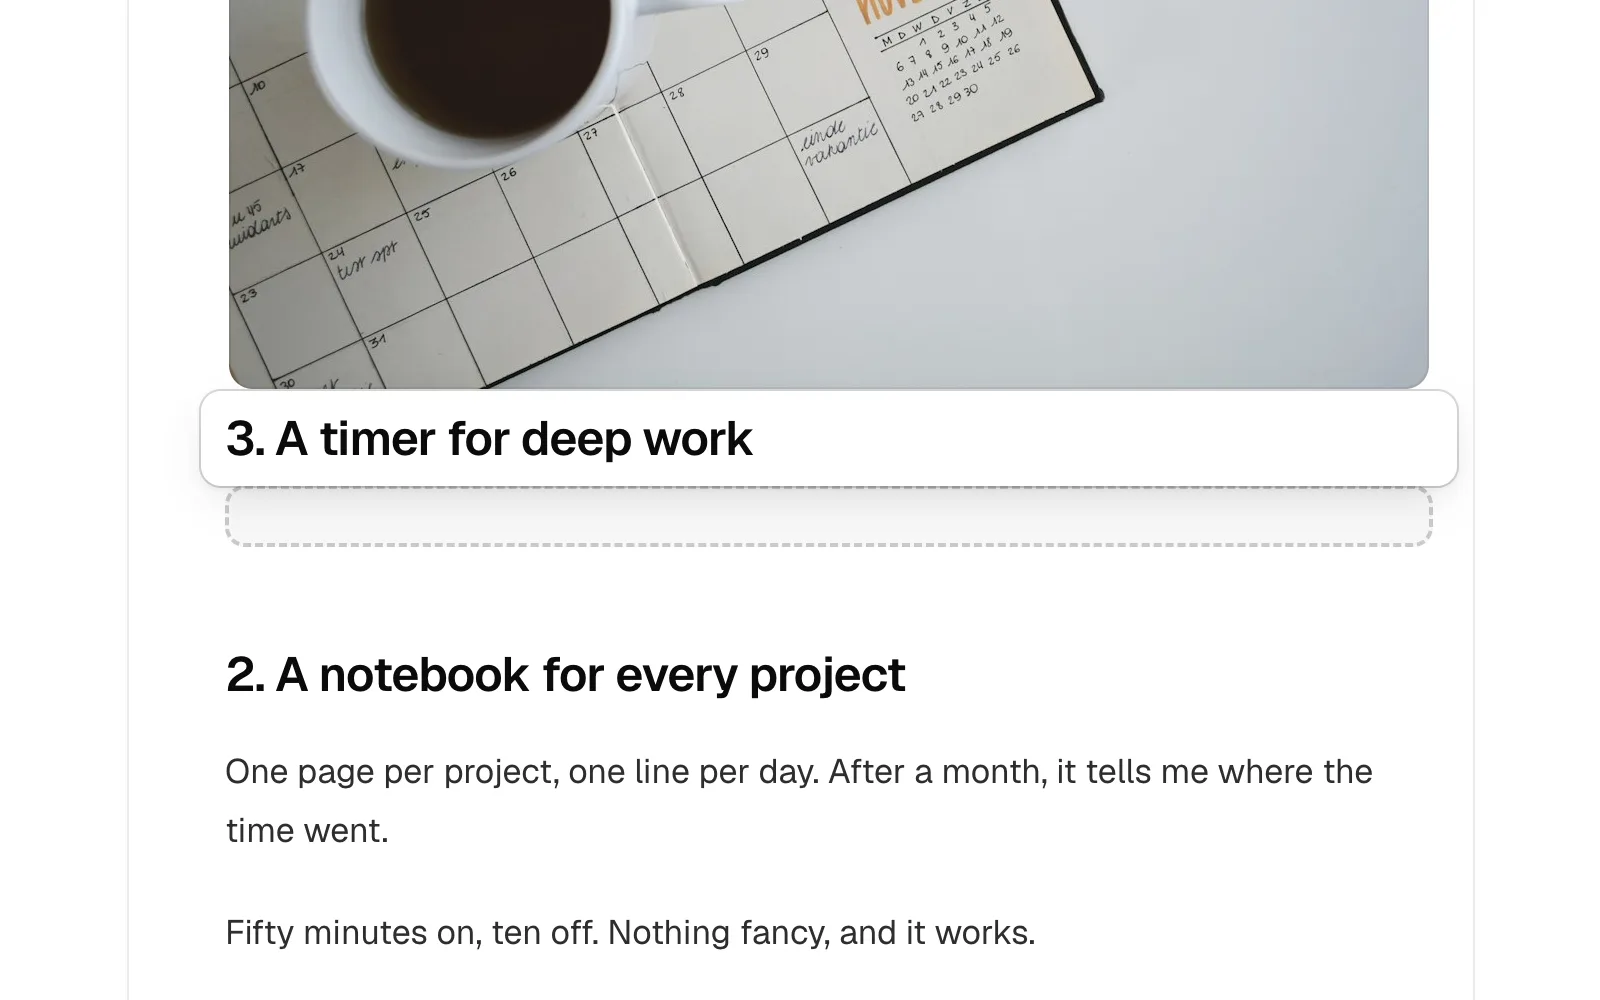
Deleting blocks
Pictures, buttons and HTML blocks go as soon as you delete them, from their bin or with the keyboard. A message at the top of the page says so for a few seconds: click Undo in it to bring the block back, or press ⌘ Z (Ctrl Z on Windows), as its button shows. The message goes once you change something else, since undo would take that back first.
What may look broken
A dot to the left of a block marks something in it that may look broken to your readers. Amber is something to check, like a link with no address or to a placeholder like example.com, a name or field that leaves a gap for readers without one, an HTML block whose tags don't match up, or text left from a template, like Lorem ipsum. Red is something to fix before the issue can go out, like a button without its link.
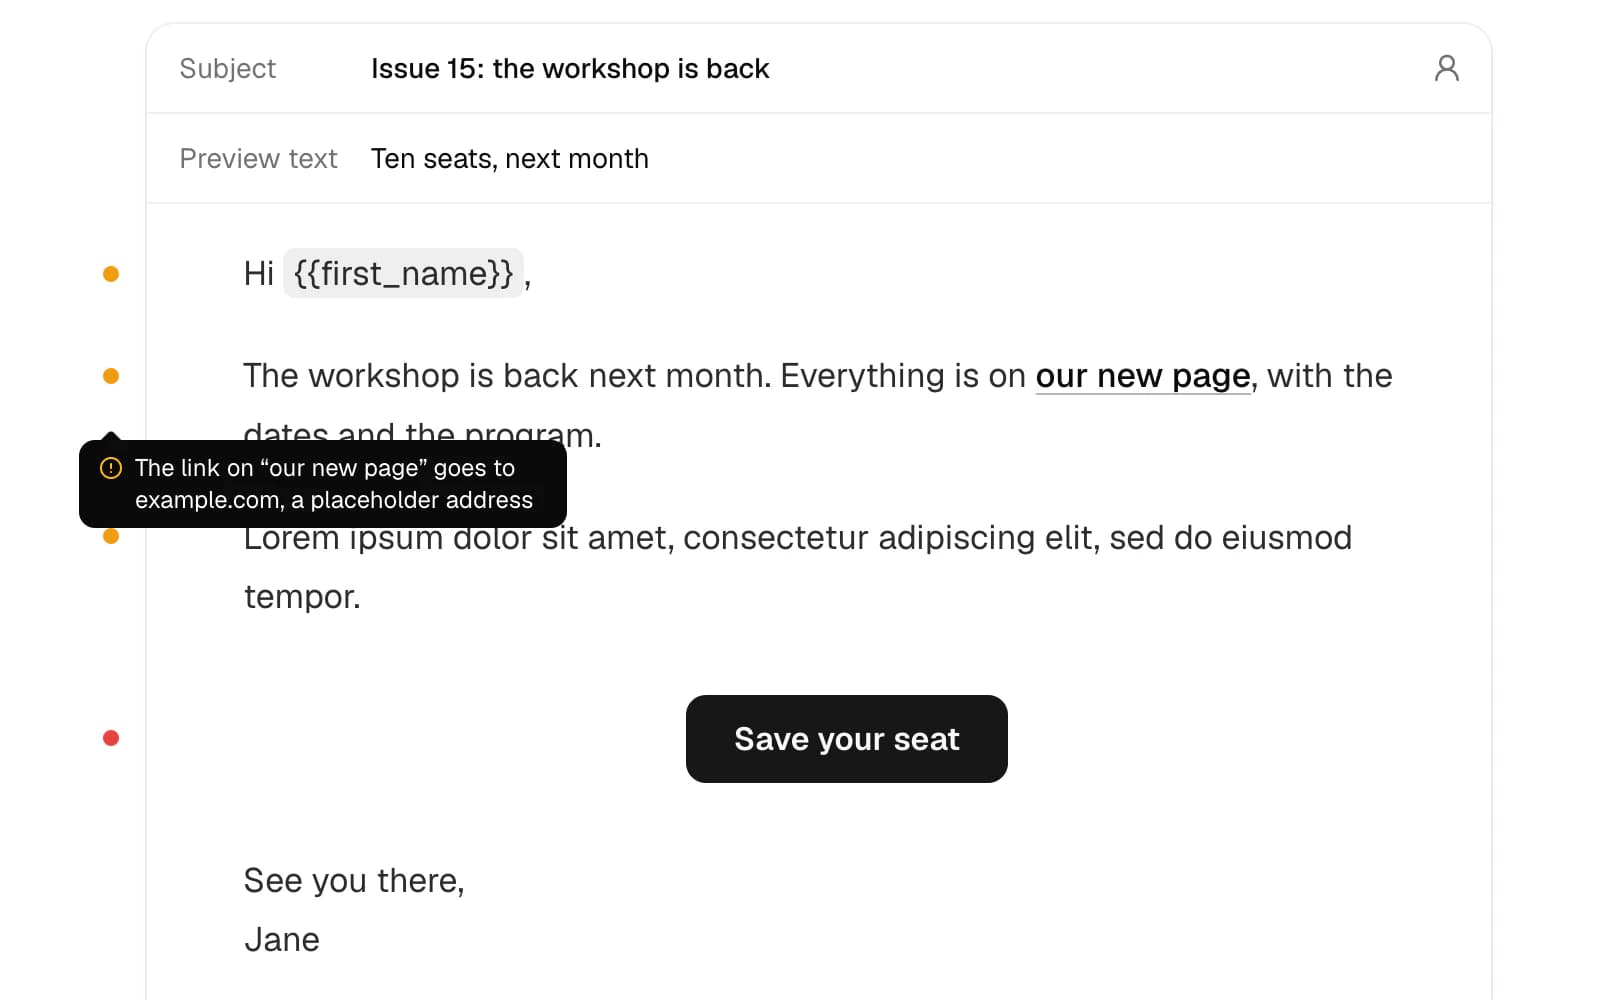
Point at a dot to read what's wrong, or click it to go there: the words in question are selected, a button opens its link and an HTML block its HTML, with what's wrong under it. The review step lists them all, and its Edit content brings you back to each, lit for a moment.
Names and fields in your emails
{{first_name}} shows each reader's first name. Type / and pick First name under Personalize, or click the person icon at the end of the subject. Both add {{first_name|there}}: the word after the bar is what readers without a first name see, so “Hi {{first_name|there}}” reads “Hi Jane” or “Hi there”. Change the word, or delete it and keep the bar, {{first_name|}}, to show nothing. A name or field without a bar gets an amber dot beside its line, since readers without a value would see a gap. In the editor, names and fields show on a gray background: point at one to see its sentence as Jane reads it, and as a reader without a value does.
You can also type them. After {{, the editor suggests the first name and your fields, narrowing them as you type: press Enter or click one to finish its tag, or keep typing to ignore them. Esc hides them.
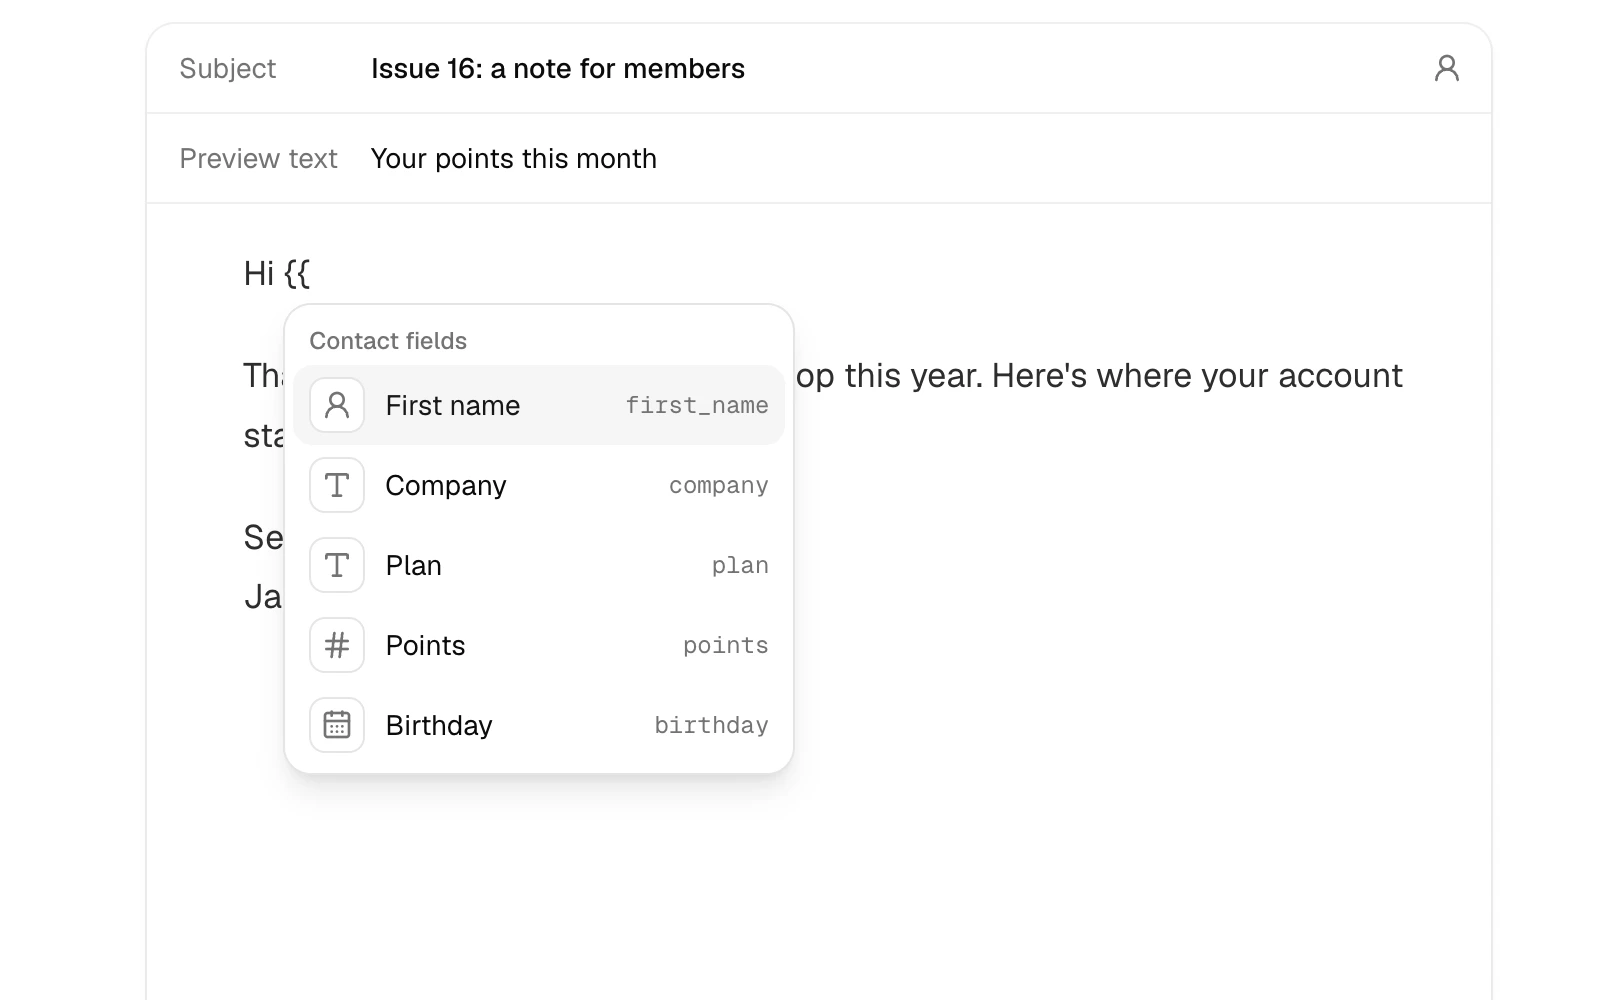
Your own contact fields work the same way, by their key: {{birthday}}, {{plan|free}}. The slash menu shows them after the first name, and typing a field's name after the slash, like /birthday, finds it right away. Add a field, at their end, opens your fields: name a new one and press Enter, and it goes where you typed the slash. The person icon in the subject lists them too, once you have some, and ends on How to add names and fields to contacts, which opens Adding fields, step by step. Text shows as it is, a number with its thousands separated (1,250), and a date written out (April 12, 1991). A reader without a value sees the fallback, or nothing. Tags never show in emails: they're for picking who gets an issue, with segments, and who sees a section of it.
Names and fields work in the subject, the preview text and the content, and in your welcome, confirmation and last-chance emails. Your website and its issue pages always show the fallback, so no reader's details are ever public. The preview shows the name Jane, with no field values, or the details of a contact you pick in it. A test email shows the contact you send it as, or Jane, or your own first name and fields if you're one of your contacts. The review step flags any other {{...}}, like a tag from another platform or a field you deleted, since it would go out as written.
Sections for some readers
A section shows part of an issue to some of your readers only, or only in your emails or only on your website. Everyone you send the issue to still gets it: a reader a section isn't for gets the same email without it.
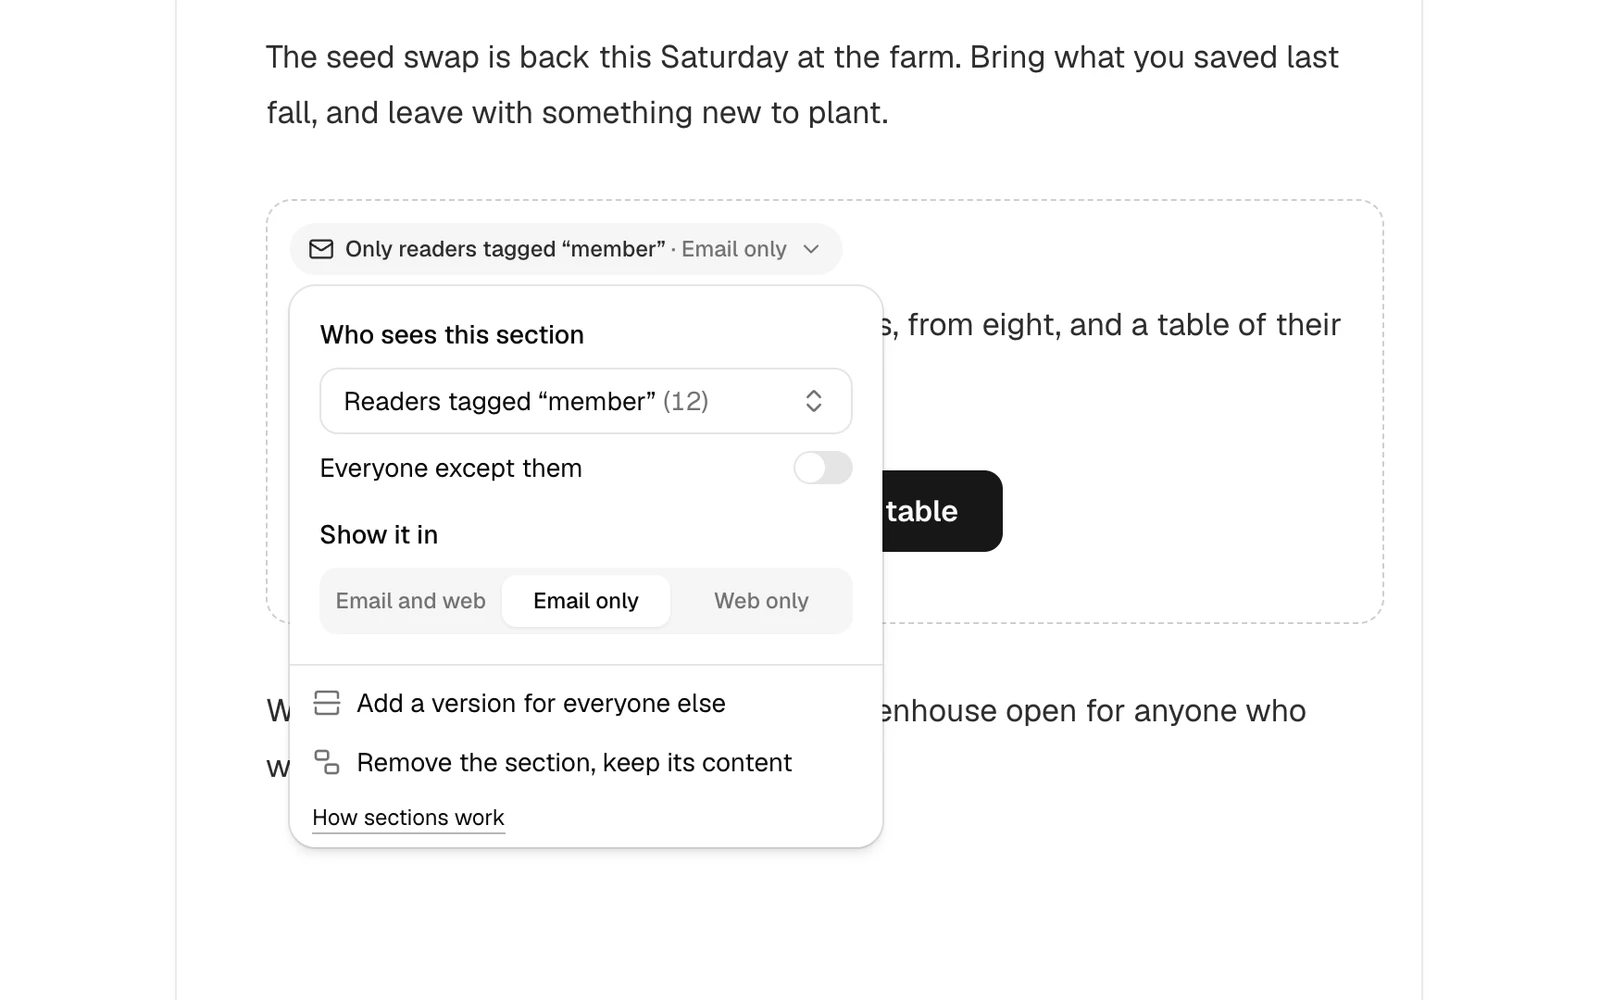
Select the text of the blocks you want in it, then click Who sees this, the dashed square at the end of the bar above them. Or type /, pick Section and write in it. A dashed outline shows where the section starts and ends, and its label says who sees it and where, like Only readers tagged “vip” · Email only, the tag or the segment in quotes. Click the label to change them:
- Who sees this section: everyone, readers with a tag, or readers in a segment, like your newest subscribers or those who opened lately. Each one in the list shows how many of the readers you send the issue to it has, and the one you picked shows it in parentheses, like Readers tagged “vip” (12). Everyone except them turns it around, for readers without the tag or outside the segment. New segment, at the bottom of the list, or Add segments while you have none, makes one without leaving the issue.
- Show it in: email and web, email only or web only. Your website doesn't know who's reading, so a section becomes email only once you pick its readers. Put it back on the web, and every visitor of your website sees it.
Add a version for everyone else puts the opposite section right under it, for the readers this one leaves out, like a thank you for your VIPs and an invitation for everyone else. Remove the section, keep its content puts its blocks back in the issue for everyone.
Each reader's sections are decided as their email goes out, with their tags and segments then. A section can hold HTML blocks but not another section, and an HTML block's HTML can't make one: put the section around the block. An issue holds 20 sections naming 10 tags or segments at most. A segment can't be deleted while a scheduled or sending issue has a section for it. In a draft, a section whose segment was deleted gets a red dot and holds the issue until you pick who sees it.
The preview shows the issue as each reader gets it. A test email has every section an email can have, to check them all in your inbox, or those of the contact you send it as. Sections are for what matters to each reader, not for secrets: a reader can forward their email.
The footer
Every email ends with its footer, which the editor shows under your issue: why readers get it, with your newsletter's name, the link to unsubscribe and, when you set one, your postal address. It goes in every email and can't be removed.
Its name is set on the General page of your newsletter's settings, its address on the Sender page. A web-only issue sends no email, so it has no footer. A whole HTML email can have its own.
Preview and test emails
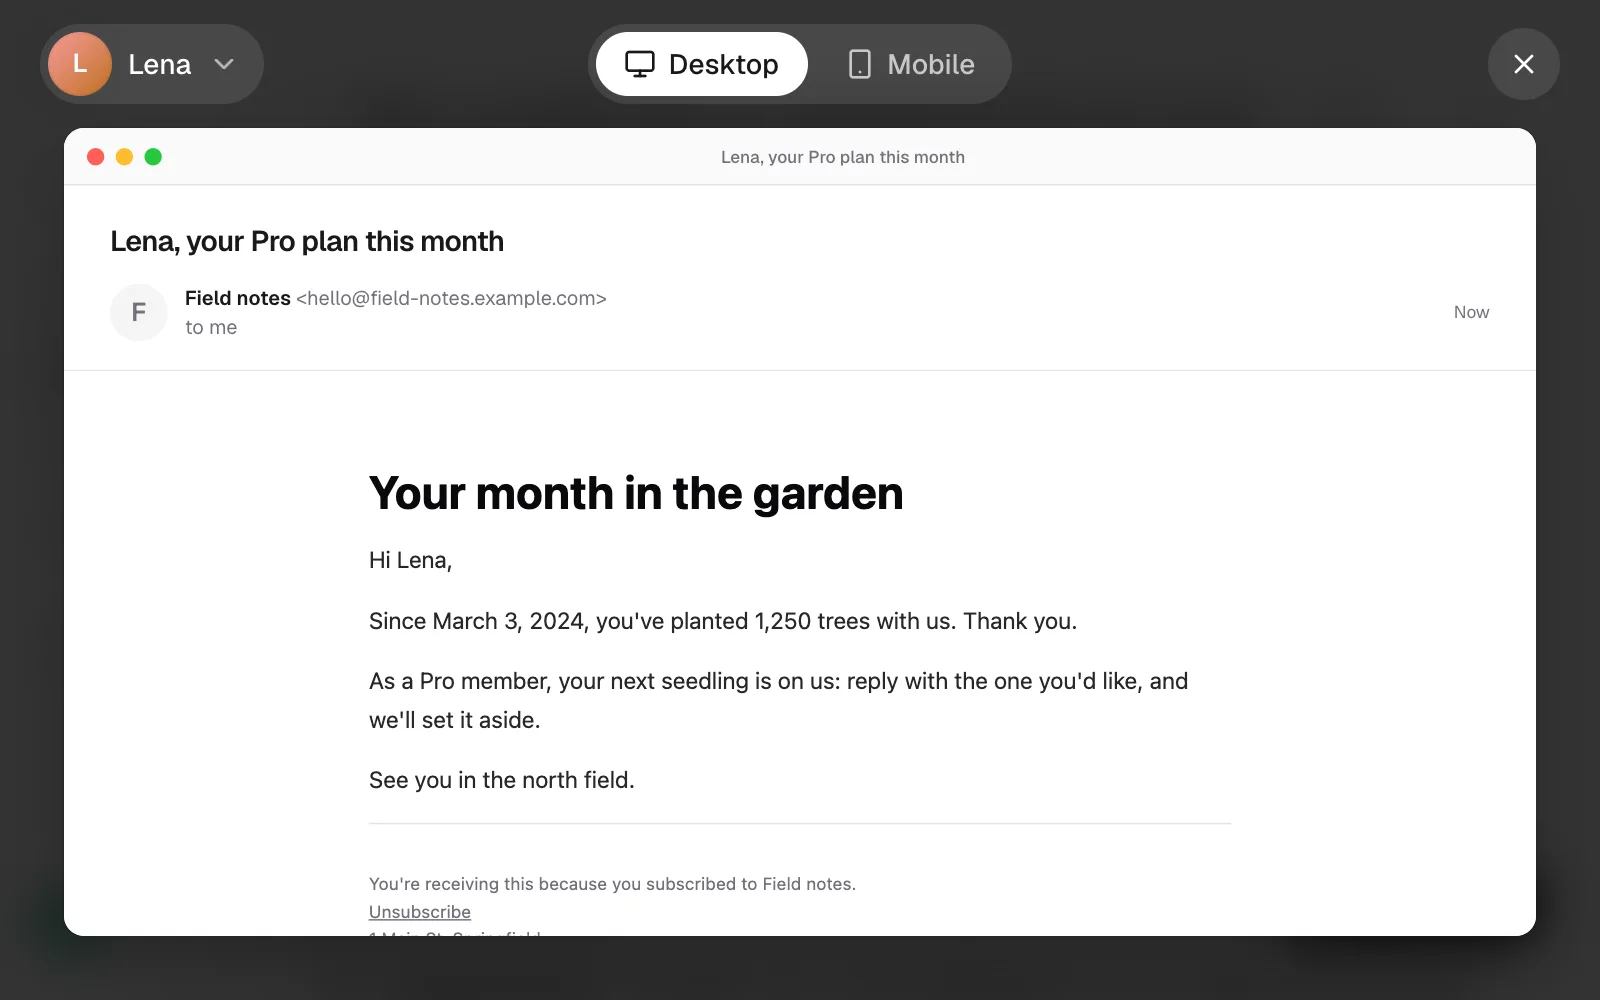
Preview, in the write step and in the ⋯ menu at any step, shows the email in a mail app's window on a desktop, or in Gmail on a phone: the inbox first, with a fingertip tapping the issue's row until you open it, then the email. On your own phone, Mobile shows the email itself, edge to edge. A link you click in it opens in a new tab, and the preview stays on the email. Press Esc to close it. Once the campaign is sent, Preview stays in the ⋯ menu at the top of its report.
Sample reader, at the top left, shows the email as a reader called Jane gets it. Click it to pick one of your active contacts instead, the newest first, each with their picture as on the Contacts page, or find one by typing any part of their email address or first name. The subject, the preview text and the email then read as that person gets them, with their first name and field values, or the fallbacks where they have none, and the sections their tags and segments get them. They stay picked while the campaign is open. An issue with sections also lists the readers they name, like readers tagged “vip”, each called Jane: Jane has no tags and is in no segment. How to add names and fields to contacts, at the bottom of the list, opens Adding fields, step by step.
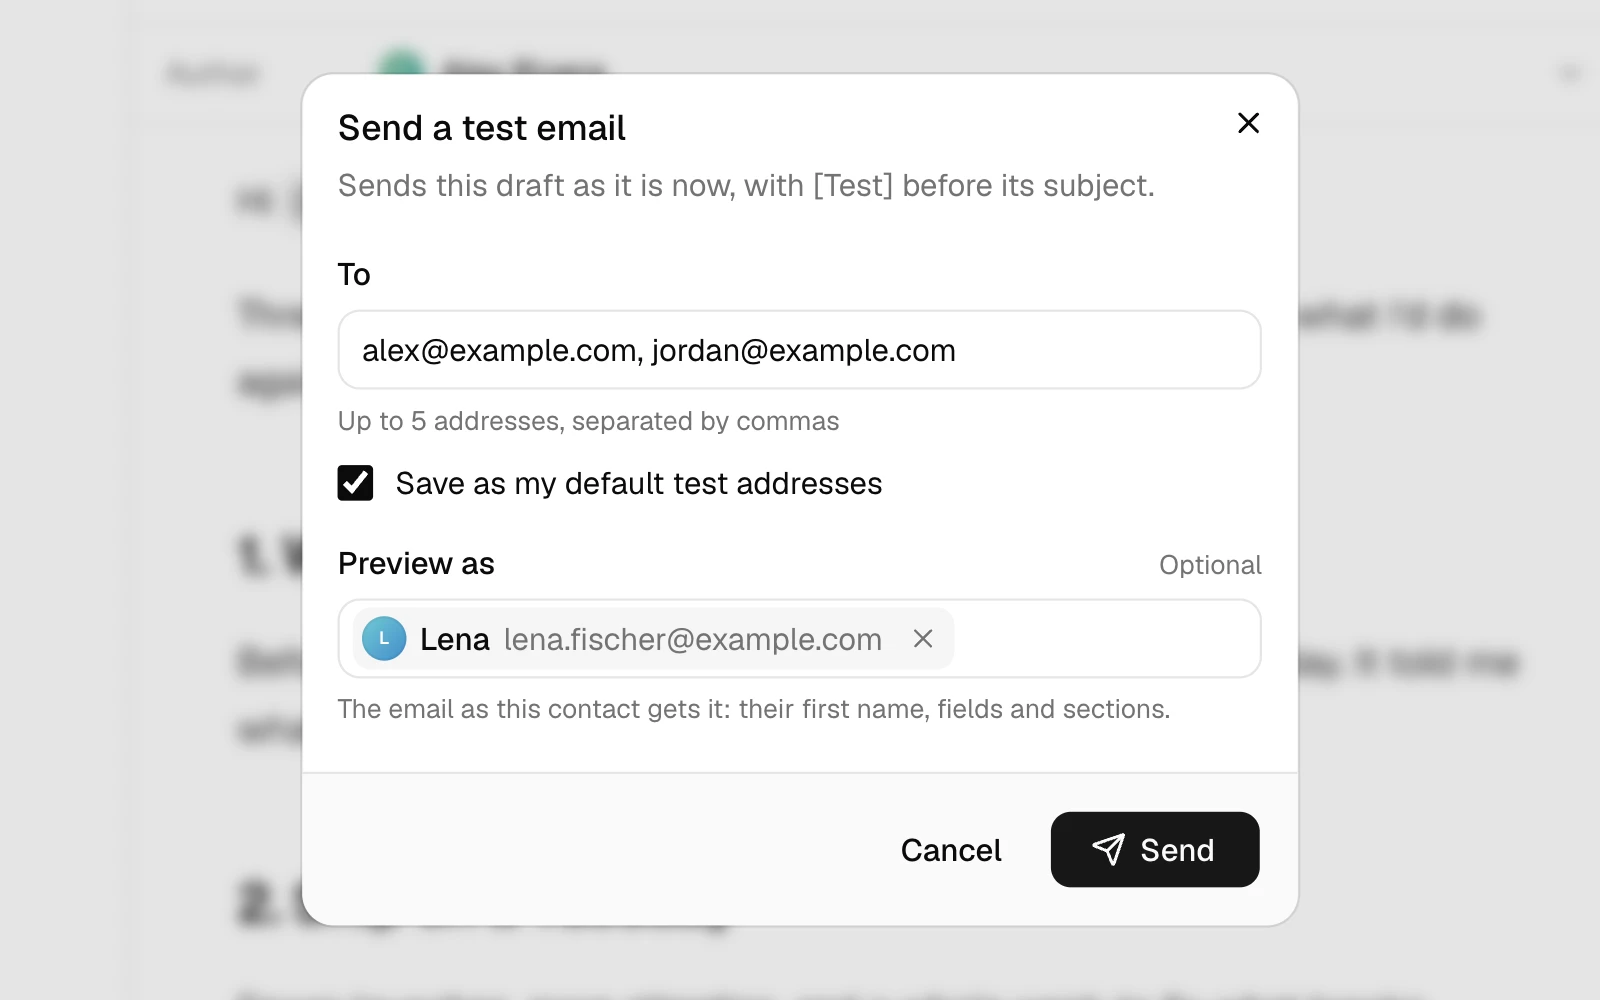
Send a test email, in the same menu and in the review step, sends the draft as it is, with [Test] before the subject. Pick where it goes and who it reads as:
- To: your own address to start with. Type up to 5 addresses, separated by commas, like a colleague who reads every issue before it goes out: each gets their own email. Save as my default test address keeps them for your next tests, here and on the Welcome email page.
- Preview as, optional: start typing to find one of your active contacts, the newest first, each with their picture. The test then reads as that person gets it, with their first name, field values and sections. They don't get it. Without one, it has every section an email of it can have, and each address reads as Jane, or as itself when it's one of your contacts.
Nobody else gets it, and its unsubscribe link unsubscribes nobody. Your team's addresses, yours and those of the people who joined the newsletter's team, get tests whenever you want. Members send tests to them, and admins to anyone else too, up to 1,000 addresses outside the team a day, each getting 10 a day at most. An address that unsubscribed from your newsletter, bounced or complained doesn't get tests. The review step reminds you when you haven't sent one. If it lands in spam: When a test lands in spam
Duplicate, discard and HTML
The ⋯ menu also duplicates a campaign into a new draft, or discards a draft. A sent campaign can't be changed, but it can come off your website. Removing an issue
To start every issue from the same layout, keep a draft with its sections and your sign-off, and duplicate it each time from its menu.
A campaign made with the API or an AI assistant can be a whole HTML document. The dashboard then shows its HTML to edit, and the footer goes at the bottom. To place your own unsubscribe link instead, put {{unsubscribe_url}} where it goes: the footer is then left out, so add your postal address to the HTML too. API and AI assistants
To add HTML to an issue you write in the editor, use an HTML block.
When you're done, send or schedule it.